

5 Easy Upcycling Projects for Pet Parents
TerraCycle® is an innovative recycling company that has become a global leader in recycling hard-to-recycle waste. Wellness Natural Pet Food is the first U.S.-based pet food brand to make its packaging nationally recyclable through a partnership with TerraCycle. So far, the partnership has resulted in over 100,000 pet food bags diverted from landfills.
Getting crafty with empty Wellness pet food packaging and common items found around the house takes a nod from our past to support the environment and reduce waste.
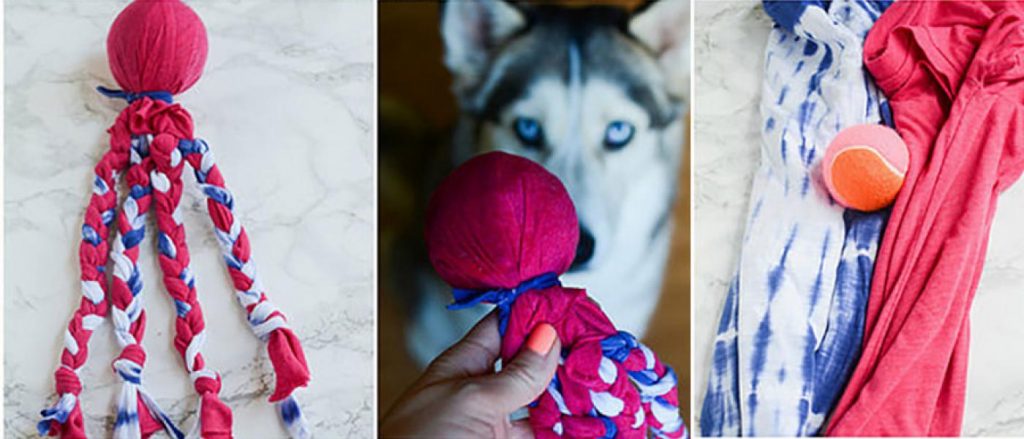
1. Tennis Ball & T-shirt Toss Toy

Materials:
- old t-shirts
- tennis ball
Tools:
- scissors
Instructions:
- Cut t-shirt into 2 thick strips (use two t-shirts if needed).
- Put in “X” formation.
- Place tennis ball in the middle.
- Fold t-shirt strips around tennis ball.
- Tie with thin piece of t-shirt.
- Take the tails and cut into strips – still attached to the top of the t-shirt.
- Braid strips.
- Knot ends or secure with t-shirt tie.
- Toss and play with pup.
2. Pet Treat Holder

Materials:
- Wellness Pet Food Bag
- ruler
- washable marker
- one (1) Velcro® tab
Tools:
- scissors
- tape
Instructions:
- Start with a clean, empty dog food bag. Cut a square that is 7 ½ inches on each side. Centered inside the square, draw a smaller square that is three inches on each side. This smaller square will be 2 ¼ inches from all edges.
- On the top edge of the smaller square, draw a semicircle that hits the top of the large square and starts and ends at opposite corners of the small square. Repeat for the other 3 sides. Cut around these lines.
- Pro tip: To give your treat pouch dimension, make an extra ¼ inch fold at the base of each semicircle.
- Along the lines of the small square, fold all 4 semicircles towards the center. Your piece should fold up to the size of the small square. Tape the bottom flap and two side flaps in place.
- Attach one side of the self-adhesive Velcro® fastener on the inside of the top flap. Then, fold down the flap so the other side of the self-adhesive Velcro® fastener attaches to the outside of the bottom flap. Let the Velcro® fastener stick where it naturally landed after you folded the top flap down.
- Fill your new treat pouch with your favorite treats for your pet.
3. Wellness Dog Cape

What You’ll Need
- Wellness Pet Food bag
- clear packing tape
- flat elastic (¼ inch wide)
Tools:
- ruler
- scissors
- pen
Instructions:
- Start with a clean pet food bag, and cut the edges off.
- Use your ruler to draw a trapezoid that is 6 inches wide at the bottom, 4 inches wide at the top, and 7 ½ inches tall.
- Fold over the narrow end, about ¾ inch.
- Use a length of tape to keep the fold closed.
- Cut a 17 ½ inch strip of elastic.
- Loop it through the fold on the cape.
- Tie and adjust accordingly so it fits your pet.
Design Tip: Cut the bottom in a funky pattern. Try a zig-zag or wavy shape!
4. Toilet Paper Roll Cat Toy

What You’ll Need
- an empty cardboard toilet paper roll
- Wellness Kittles (optional, but highly recommended)
Tools:
- ruler
- scissors
- pen
Instructions:
- Mark 4 finger-width (about ¼ inch) marks on the side of the cardboard roll.
- Use the scissors to cut each ring.
- Insert the first ring into the second ring, then continue with the third and fourth, until you’ve formed a ball.
- Fill the toy with some delicious Wellness Kittles and your cat will spend some fun time trying to get to them!

5. Collapsible Pet Water Bowl

Materials:
- Wellness Pet Food Bag
- four (4) Velcro® tabs
- clear tape
Tools:
- ruler
- pen or marker
- scissor
Instructions:
- Start with a clean pet food bag.
- Flatten out the package and measure the width.
- Measure and mark lines on both ends to make the length of the wrapper the same size as the width. A 10-inch square or smaller will probably work best.
- Cut along your marked lines.
- Mark a border 2 inches from the edge along each side of the square.
- Fold and crease firmly along this line. Unfold and flatten it.
- Fold up two sides at one corner of the square. Make a diagonal crease from the corner to the folded border creating an upright triangle. Repeat this for all corners, then unfold them.
- Take the Velcro® tabs, unfasten them, and stick each one on either side of the corner of the square, one per triangle. Make sure that they will line up when fastened.
- Fold up the bowl at the corners and press the hook and loop fasteners together. You are ready to dish up your pet’s favorite snack in your new bowl.
Have you tried any of these DIY projects? We want to see your results! On Instagram, tag @wellnesspetfood and #WellnessTerraCycleDIY for a chance to be featured on our social communities or website!